Performing analysis#
ospgrillage contains a load module which wraps OpenSeesPy commands to perform load analysis.
For all example code in this page, ospgrillage is imported as og
import ospgrillage as og
Load analysis workflow#
Figure 1 shows the flowchart for the load module of ospgrillage.

Figure 1: Load analysis utility flow chart#
Defining loads#
Loads are created with the interface function create_load().
Users pass argument for type= to specify the load type.
Available loads types include Point, Line, and Patch loads.
Each load type requires user to specify its load point(s).
This is achieved by create_load_vertex() function.
This function creates a LoadPoint(x,y,z,p) where x,`y`,`z` are the coordinates of the load point and p is the magnitude of the vertical loading.
Note, p is a unit magnitude which is interpreted differently based on the load type - this will be later explained.
By default, y is 0 i.e. the grillage model plane.
point_load_location = og.create_load_vertices(x=5, z=2, p=20) # create load point
Depending on the load type, a minimum number of LoadPoint namedTuple are required.
These are set to each load type’s point#= variable for the load type’s coordinate system, where # is a digit from 1 to 9.
Following sections will further elaborate the load vertices for each load type.
Loads are generally defined in the global coordinate system with respect to the created grillage model. However, a user-defined local coordinate system is required when defining Compound load later on.
Nodal loads#
Nodal loads are load applied directly onto nodes of grillage model.
Nodal loads are defined using create_load(), specifying type= "nodal".
There are six degrees-of-freedom (DOFs) for acting loads in each node of the grillage model.
Nodal loads do not require a load vertex, instead it requires a NodalForce(Fx,Fy,Fz,Mx,My,Mz) namedtuple. The following example creates a NodalForce namedtuple and a nodal load on Node 13 of a model, with 10 unit force in both transverse X and Y directions.
nodalforce = og.NodalForce(Fx=10,Fy=10)
node13force = og.create_load(type="nodal",name="nodal 13", node_force=nodalforce) # load values in other dofs default to 0
Note
Users only have to specify non-zero load values for the desire DOFs for NodalForce. Any non-specified component are defaulted to zero.
Point Loads#
Point load is a force applied on a single infinitesimal point of the grillage model. Point loads are used represent a large range of loads, such as truck axle, or superimposed dead load on a deck.
Point loads are created using create_load(), passing type = "point".
Point load takes only a single LoadPoint tuple. p in the tuple should have units of force (eg. N, kN, kips, etc)
- see Figure 2.
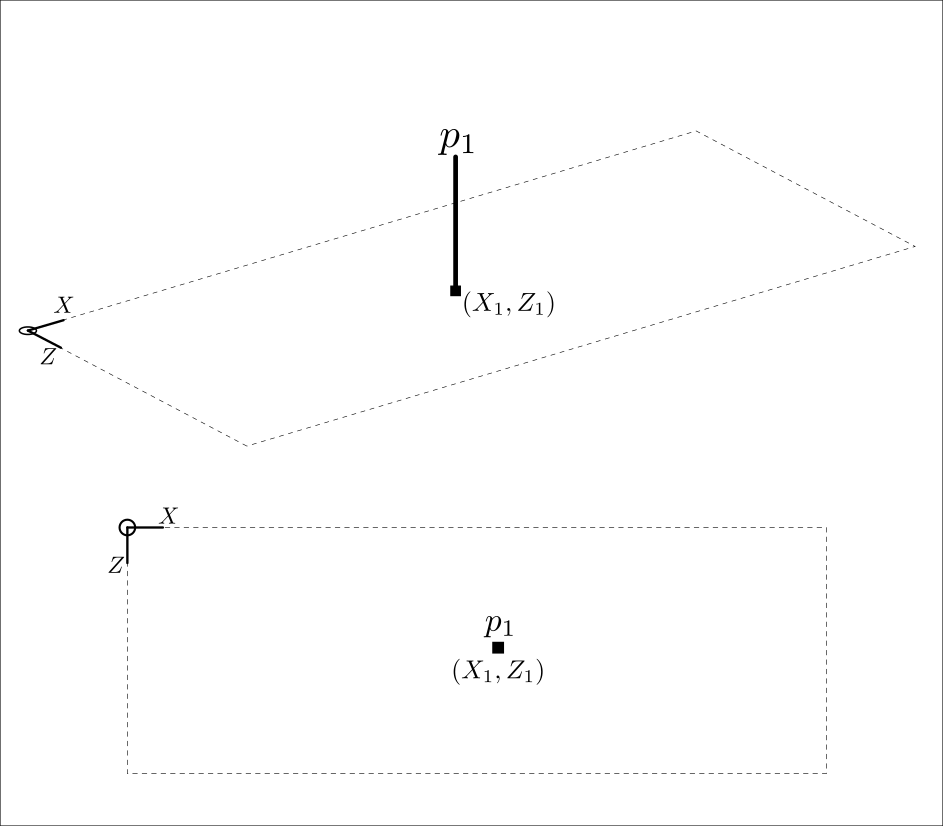
Figure 2: Point load#
The following example code creates a 20 force unit point load located at (5,0,2) in the global coordinate system.
point_load_location = og.create_load_vertices(x=5, z=2, p=20)  # create load point
point_load = og.create_load(type="point",name="single point", point1=point_load_location)
Line Loads#
Line loads are loads exerted along a line. Line loads are useful to represent loads such as self weight of longitudinal beams or distributed load along beam elements.
Line loads are instantiated with create_load() passing type = "line" and required at least two LoadPoint`s (corresponds to the start and end of the line load) - see Figure 3.
Using more than two tuples allows a curve line loading profile.
`p in the LoadPoint tuple should have units of force per distance (eg. kN/m, kips/ft, etc).

Figure 3: Line load#
The following example code is a constant Two force per distance unit line load (UDL) in the global coordinate system from -1 to 11 distance units in the x-axis and along the position in the z-axis at 3 distance units.
barrier_point_1 = og.create_load_vertices(x=-1, z=3, p=2)
barrier_point_2 = og.create_load_vertices(x=11, z=3, p=2)
Barrier = og.create_load(type="line", name="Barrier curb", point1=barrier_point_1, point2=barrier_point_2)
Note
As of release 0.1.0, curved line loads are not available.
Patch loads#
Patch loads are useful to represent loads distributed uniformly over a certain area such as traffic lanes.
Patch loads are instantiated create_load(), specifying type = "patch".
Patch load requires at least four LoadPoint tuple (corresponds to the vertices of the patch load) - see Figure 4.
Using eight tuples allows a curve surface loading profile.
p in the LoadPoint tuple should have units of force per area.
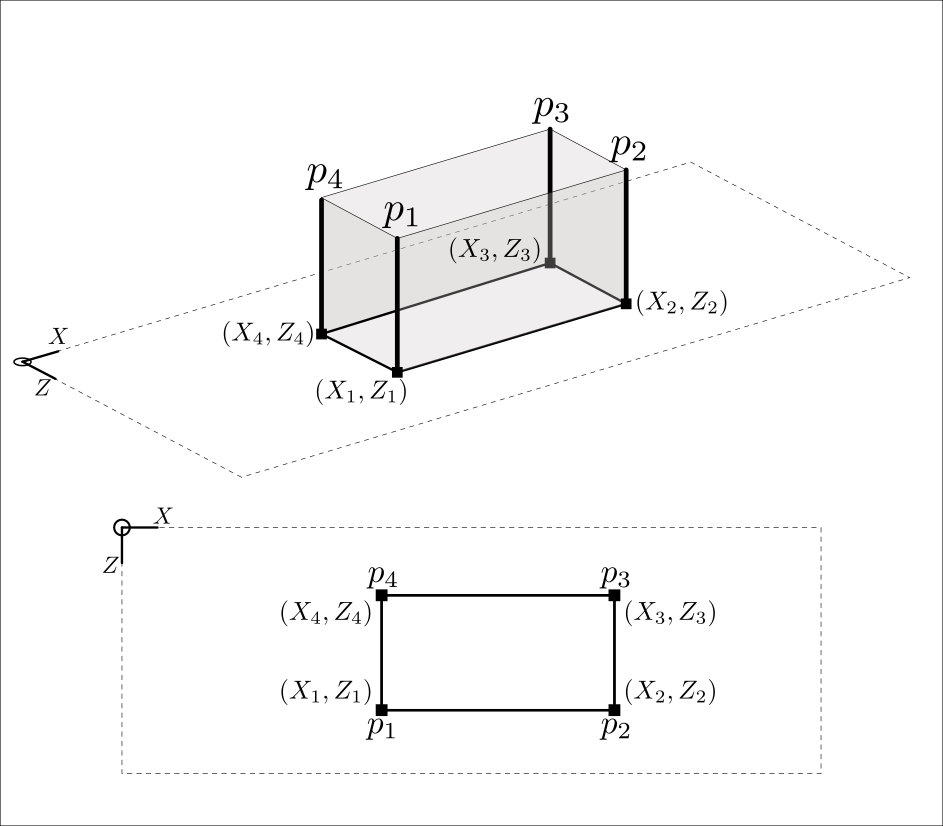
Figure 4: Patch load#
The following example code creates a constant 5 force per area unit patch load in the global coordinate system.
lane_point_1 = og.create_load_vertices(x=0, z=3, p=5)
lane_point_2 = og.create_load_vertices(x=8, z=3, p=5)
lane_point_3 = og.create_load_vertices(x=8, z=5, p=5)
lane_point_4 = og.create_load_vertices(x=0, z=5, p=5)
Lane = og.create_load(type="patch",name="Lane 1", point1=lane_point_1, point2=lane_point_2, point3=lane_point_3, point4=lane_point_4)
Note
As of release 0.1.0, curved patch loads are not available.
Compound loads#
Two or more of the basic load types can be combined to form a Compound load. All load types are applied in the direction of the global \(y\)-axis. Loads in other directions and applied moments are currently not supported.
To create a compound load, use the create_compound_load() function.
This function creates a CompoundLoad object.
Compound load are typically defined in a local coordinate system and then set to global coordinate system of the grillage. Figure 5 shows the relationship and process of mapping local to global system of a compound load.
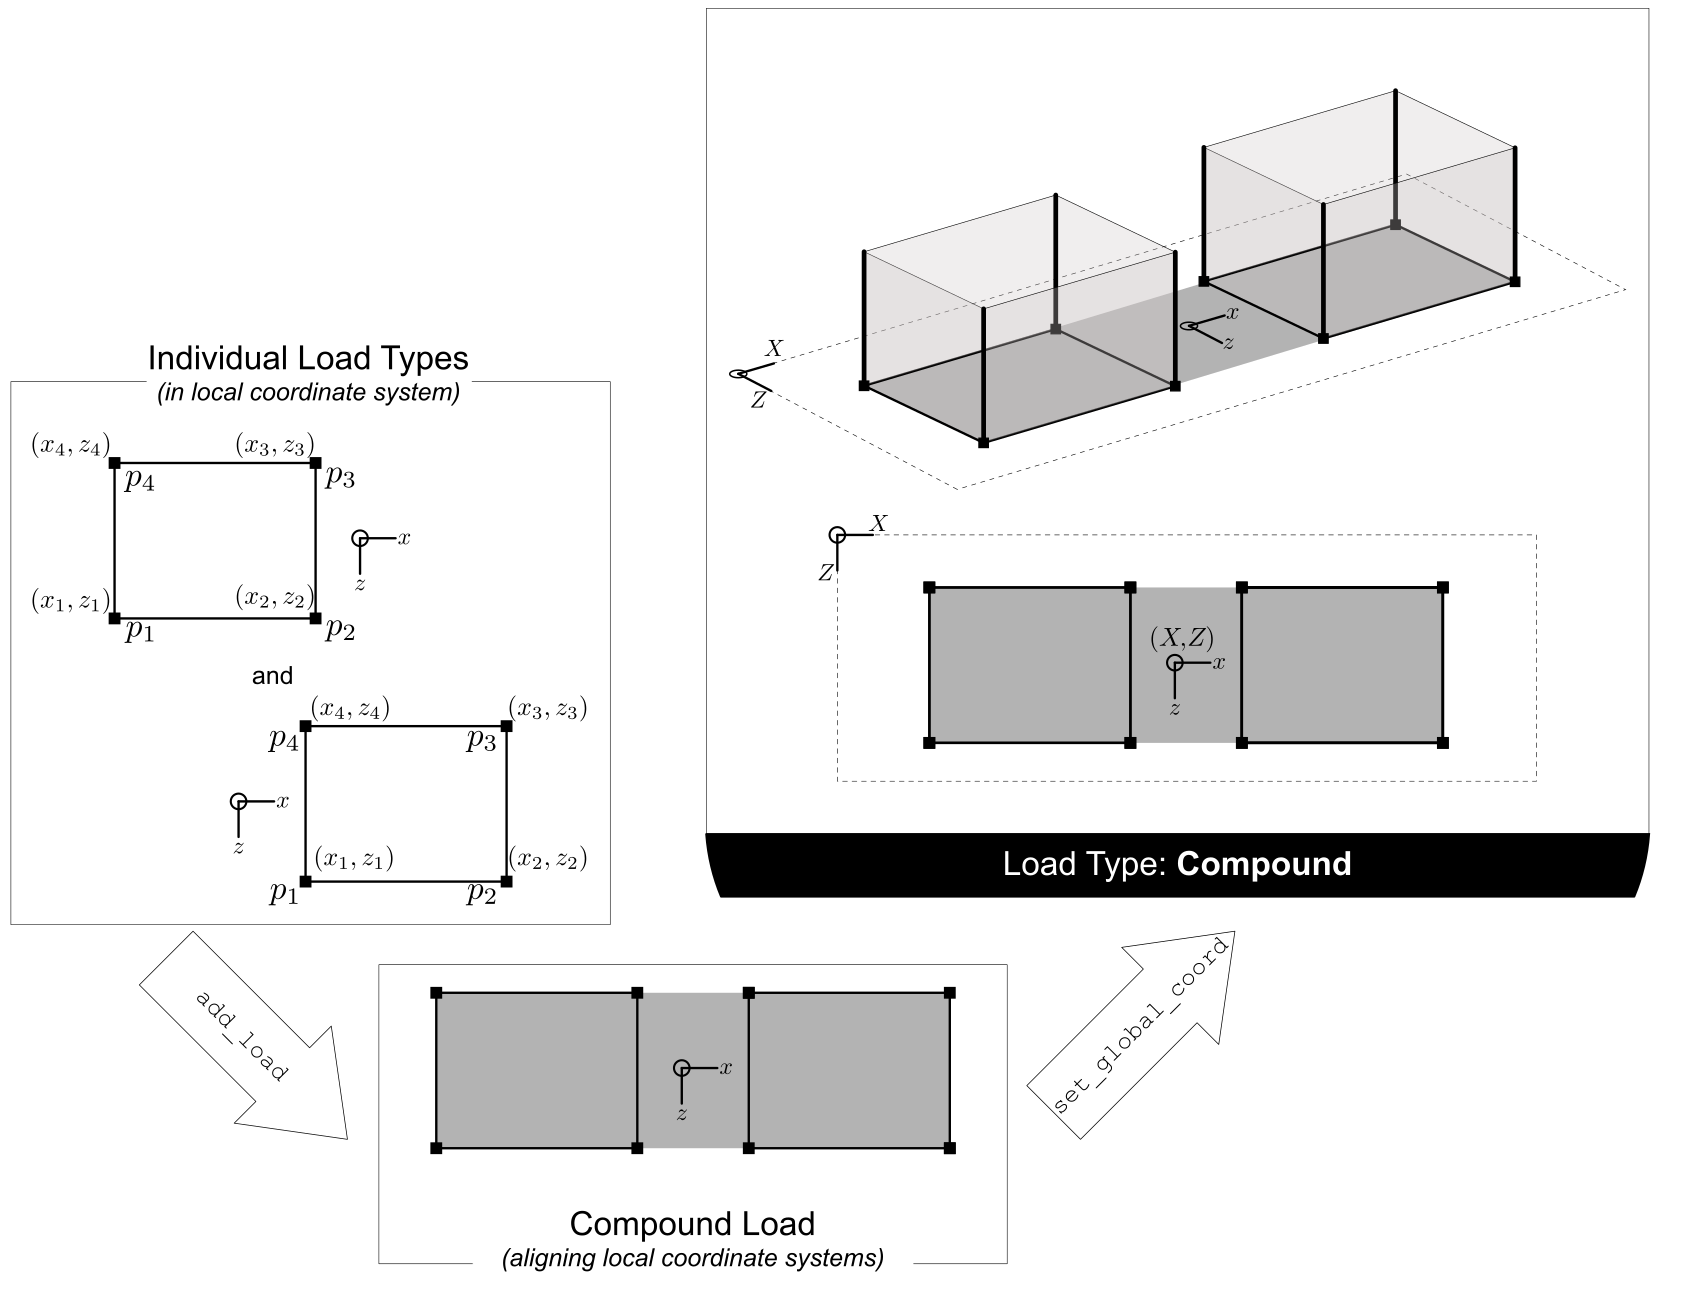
Figure 5: Compound load#
The following code creates a point and line load which is to be assigned as a Compound load.
# components in a compound load
wheel_1 = og.create_load(type="point", point1= og.create_load_vertices(x=0, z=3, p=5))  # point load 1
wheel_2 = og.create_load(type="point", point1= og.create_load_vertices(x=0, z=3, p=5))  # point load 2
The following code creates a Compound load and adds the created Loads objects (Point, Line, Patch) object to the Compound load object:
C_Load = og.create_compound_load(name = "Axle tandem")  # constructor of compound load
C_Load.add_load(load_obj=wheel_1) # add wheel_1
C_Load.add_load(load_obj=wheel_2) # add wheel_2
After defining all required load objects, CompoundLoad requires users to define the global coordinate to map the origin of user-defined local coordinates
to the global coordinate space.
This is done using set_global_coord() function as seen in Figure 5, passing a `Point(x,y,z)` namedTuple.
If not specified, the mapping’s reference point is default to the Origin of coordinate system i.e. (0,0,0).
The following example sets the local Origin of the compound load, including all load points for all load objects of C_load by x + 4, y + 0 , and z + 3.
C_Load.set_global_coord(Point(4,0,3))
Coordinate System
When adding each load object, the CompoundLoad class allow users to input a load_coord= keyword argument.
This relates to the load object - whether it was previously defined in the user-defined local or in the global coordinate system.
The following explains the various input conditions
Note
Compound loads require users to pay attention between basic and global coordinate system (see ModuleDoc for more information on coordinate systems)
At the current stage, the CompoundLoad parses the load object within local coordinate system.
When pass as input into LoadCase, the Compound load’s vertices / load points are automatically converted to global coordinates, based on the inputs of set_global_coord function
Load cases#
Load cases are a set of load types (Point, Line, Patch, Compound load) used to define a particular loading condition. Compound loads are treated as a single load group within a load case having same reference points (e.g. tandem axle) and properties (e.g. load factor)
After load type objects are created, users add the load objects to LoadCase class objects.
First, users instantiates a LoadCase class object and giving it its name.
DL = create_load_case(name="Dead Load")
Users then pass load objects as input parameters using add_load_groups() function.
The following code line shows how the above load types are added to DL load case.
DL.add_load_groups(point_load)  # each line adds individual load types to the load case
DL.add_load_groups(Barrier)
DL.add_load_groups(Lane)
After adding loads, the LoadCase object is added to grillage model for analysis using the
add_load_case. of OspGrillage class.
Users repeat this step for any defined load cases.
example_bridge.add_load_case(DL) # adding this load case to grillage model
Moving load#
For moving load analysis, users create moving load objects using MovingLoad class.
The moving load class takes a load type object (Point, Line, Patch, Compound load) and moves the load through a path points described by a Path object.
Figure 6 summarizes the relationship between moving loads, paths and the position of the loads on the grillage model.
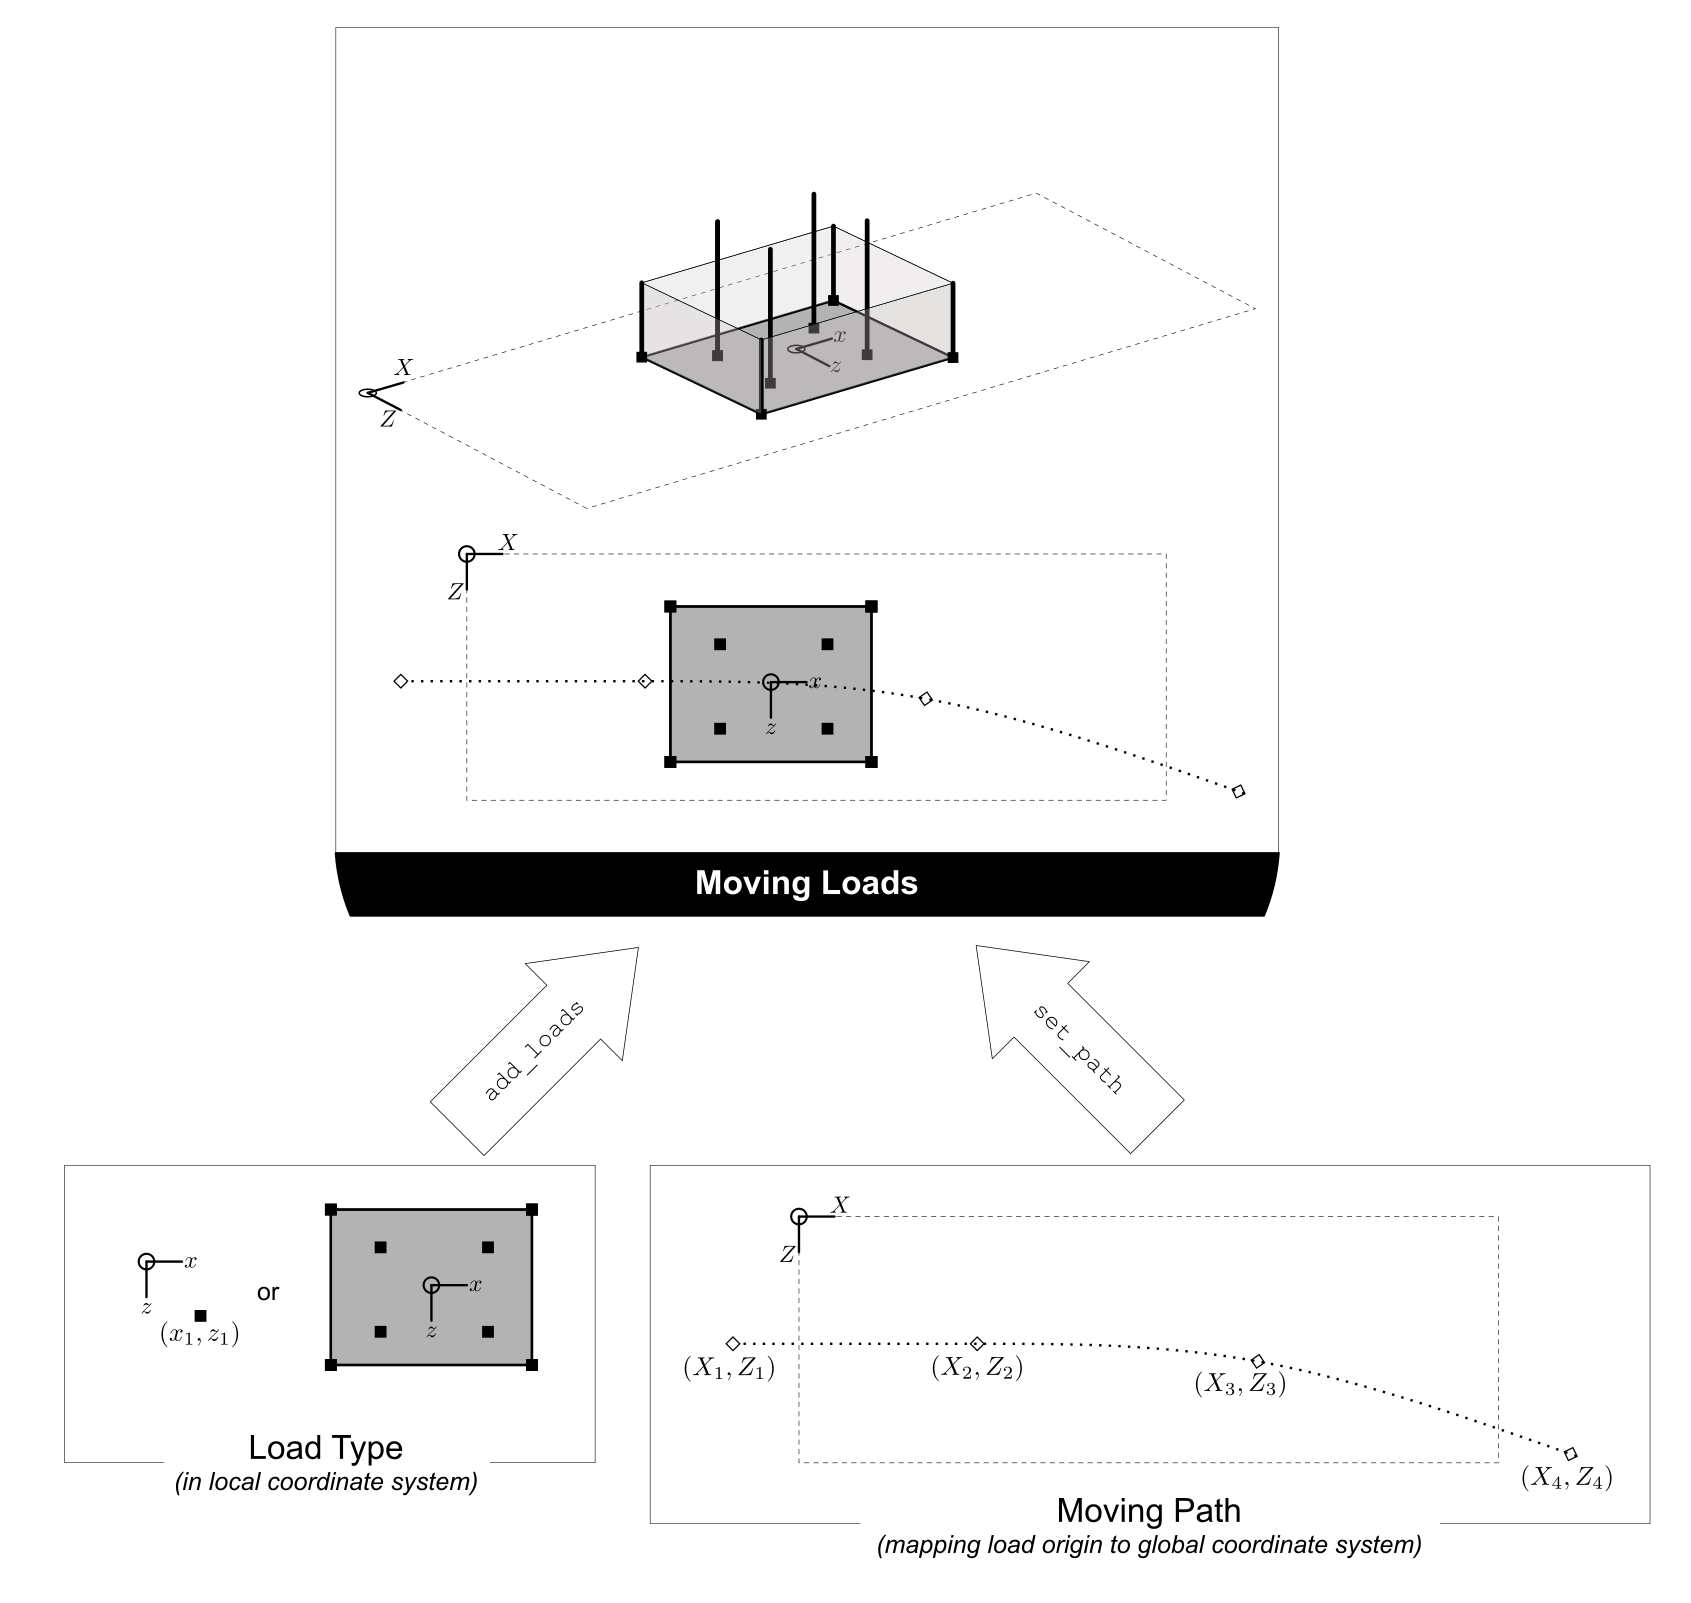
Figure 6: Moving load#
Moving path#
Path object is created using create_moving_path().
Path requires two namedTuple Point(x,y,z) to describe its start and end position.
The following example creates a path from 2 to 4 distance units in the global coordinate system.
single_path = og.create_moving_path(start_point=og.Point(2,0,2), end_point= og.Point(4,0,2))
Creating moving load#
The following example code creates a compound load consisting of two point loads moving along the defined single_path
# create components of compound load
front_wheel = og.create_load_vertices(x=0, z=0, p=6)
back_wheel = og.create_load_vertices(x=-1, z=0, p=6)
Line = og.create_load(type="line",point1=front_wheel,point2=back_wheel)
tandem = og.create_compound_load("Two wheel vehicle")

move_line = og.create_moving_load(name="Line Load moving") # moving load obj
move_line.set_path(single_path)   # set path
move_line.add_loads(load_obj=Line)  # add compound load to moving load
From here, use the add_load_case() function of the OspGrillage to add the moving load.
Here, the function automatically creates multiple incremental load cases each of which corresponds to the incremental load positions along the moving path.
example_bridge.add_load_case(move_point)
Advance usage#
All basic load added to a MovingLoad class via add_loads() function
are assigned with a single common Path object.
MovingLoad allows a more advance usage whereby individual moving path can be set to each basic load within MovingLoad.
For this, the setup for MovingLoad requires definition of a global_increment parameter which ensures each unique
Path object of basic load has the same global_increment.
Following, each basic load added via add_loads() takes a second argument path_obj, which is its corresponding Path object.
Following example shows this procedure:
# create moving load with global increment of 20 for all unique moving path
moving_load_group = og.create_moving_load(name="Line Load moving",global_increment=20)

# add load + their respective path
move_load_group.add_loads(load_obj=truck_a,path_obj=path_a)
move_load_group.add_loads(load_obj=truck_b,path_obj=path_b)
Running analysis#
Once all defined load cases (static and moving) have been added to the grillage object, analysis can be conducted.
To analyse load case(s), users run the class function analyze().
By default analyze() will run all defined load cases.
If users wish to run only a specific set of load cases, pass a list of load case name str to loadcase= keyword.
This will analyse all load cases of the list.
Following example shows the various options for analyze().
# analyze all
example_bridge.analyze()
# or a single str
example_bridge.analyze(load_case="DL")
# or a single element list
example_bridge.analyze(load_case=["DL"])
# or a list of multiple load cases
example_bridge.analyze(load_case=["DL","SDL"])